A wide range of elements all work in unison to make up the performance equation of a race car, with horsepower and torque obviously a key factor. But it doesn’t take an engineering major to understand just how much weight plays a role in the ultimate capability of any vehicle, much less a dedicated race car that has to get up and go from a standing start. Every pound adds up to thousandths, hundredths, even tenths of a second on the race track, and even when working against a class-mandated minimum weight requirement, producing the lightest car possible has it’s distinct advantages in terms of chassis tuning.
 In an effort to illustrate this, we’ve embarked on a mission to shed some pounds from our 275 radial tire project car known as BlownZ, with the installation of a set of fiberglass doors to replace the bloated factory doors we’ve been lugging down the quarter-mile for the last two seasons. In May, we cranked off our first seven-second pass with a 7.69 in Pomona, which was a huge step for us, but still a good two tenths away from being competitive in the class. We’re making decent power with our supercharged LSX engine, but tipping the scales at a full 200 pounds over the minimum weight, not only are we lugging a lot of excess baggage, so to speak. Also we don’t have the ability to distribute any weight where we’d like it, which is a prime reason racers go to great lengths, financially, to build cars under the minimum weight.
One of the first places that many grass roots racers turn and where we’ve turned based on the allowance in the NMCA rules, are aftermarket fiberglass doors. Paired with lexan windows, we’ve weighed the doors and found there to be 100-120 pounds saved by moving to the fiberglass doors, and as you can imagine, that’s a lot in a car like ours. In this tech article, we’re going to walk you though the process of mounting up a set of aftermarket doors on your race car, using a number of DIY components from the folks at Tim McAmis Performance Parts.
McAmis Project Parts List
- Unbent Window Frame Kit #TMR-1266K
- Aluminum Window Screw Kit #TMR-3000AK
- Adjustable Countersink Tool #TMR-1303
- Upper Door Latch Kit #TMR-1142K
- Door Latch Kit #TMR-1185K
- Glass Cleaner #TMR-G50
- Door Hinge Kit TMR-1235K
- Window Trim Paint #RUS-SEM-61023
- Door Stop Strap Kit #TMR-1143K
- (4) 5Lb Lead Puck #TMR-PUCK
Our One-Stop Parts Shop
Our latest undertaking centers around a set of bare, fiberglass doors for the ’98-02 Camaro that we recently obtained. Without windows, a window frame, hinges, latches, or anything installed, this will be a ground-up project that will really give you a look at the entire process.
As you can see, virtually our entire project is made possible with components out of the extensive McAmis catalog, of which you can find almost any part you’d need for your car build, regardless of the level at which you race.
“We’ve geared our business toward the Pro Modified and Top Sportsman cars all through the years, but we’re getting into the small-tire racing categories more these days, and so we’ve shifted the business toward the parts sales for the do-it-yourself racers who are building cars in their own garages,” explains Billy Johnston of Tim McAmis Performance Parts. “This allows us to reach out more to the racers in these classes, and we have vehicles in-house that we’re using to develop additional components for the marketplace in the future”
Johnston continued, “We’re adding new parts to the catalog every day, from body panels to composite pieces and hardware — every day it’s something different.”
While the parts and pieces out there available through a catalog run the gamut in cost and therefore quality, those that McAmis offers — and what we’re using on our install — are just like those used by McAmis’ ADRL, X-DRL, NHRA, and other professional class customers.
A few of the parts kits that we'll be using on our project, including the upper and lower door latches with all of the necessary hardware. These parts, which are the very same quality parts you'd find on a full in-house build at Tim McAmis Race Cars, com with complete and detailed instructions to walk you through the DIY project.
“The same parts and components that we use on our complete race cars are the very same pieces that we keep on the shelf as part of the performance parts division that you can buy and install in your garage,” says Johnston.
The same parts and components that we use on our complete race cars are the very same pieces that we keep on the shelf as part of the performance parts division that you can buy and install in your garage. – Billy Johnston
Getting Door’ed
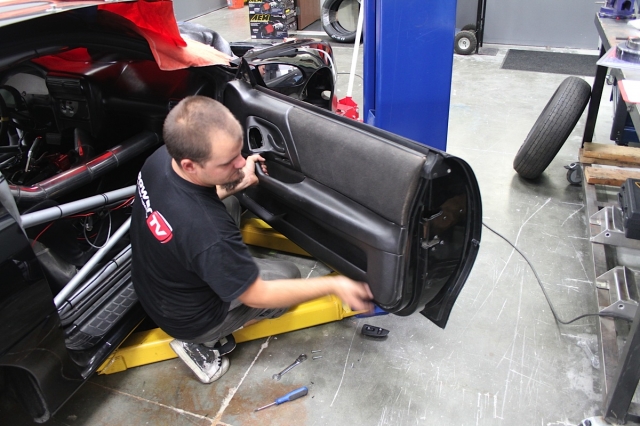
The process of installing our new fiberglass doors begins, as you might have guessed, with the removal of the factory doors. All 72 pounds of them…per door.
Once the original door is off the car, it’s time to begin evaluating what can stay and what can go. Luckily, because of the latching system that TMPP uses, we’re able to utilize the OEM door strikers. However, because these are going to be lift-off style doors just like any full chassis-style car, the OEM hinges and hinge mounts have to go.
With the new hinges firmly in place, it’s time to turn our attention to the door side. As part of the TMPP hinge package, we were supplied with a pair of aluminum strips, about 15-inches long by three-inches wide, that are bolted to the inside of the door to help distribute the load across the fiberglass construction of the door. As you can imagine, the stresses and weight being positioned on just a small area of the rather thin fiberglass (where the tabs are bolted) could eventually crack it. Instead, the door hinge tabs are bolted to these strips for extra peace of mind.

We begin with removal of the factory doors, hinges, and wiring harness, providing a fresh starting point for our new fiberglass doors.
The entire factory door setup tipped the scales at a hefty 72 pounds each. While the bare door is a featherweight 14 pounds.
From here, we move back to the latch in order to make the door functional. The latch supplied by TMPP is a standard thread size, whereas the latch pin in the car is of factory dimension, so we had to start by shaving down the latch pin to make them compatible. In a full-tube car, you’d typically have a matching latch pin for the latch, but we chose to improvise.
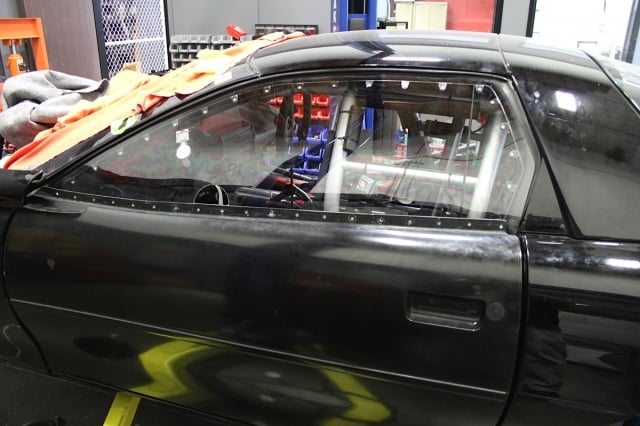
Our friends at Optic Armor Performance Windows supplied us with a set of their lightweight, ultra-durable lexan side windows for our project, providing not only a lighter option, but a safer one for racing purposes, as well. The side windows are slightly oversized for trimming to fit the car, and we had to trim about four-inches away to make them fit like a glove. We then proceeded to lay out our bolt spacing, drill the windows for mounting, and bolted them to the lip in the door.

Our good friends at Optic Armor Performance Windows hooked us up with a set of their lightweight, highly durable polycarbonate lexan side windows for the project, allowing us to shed some additional weight and take on an added degree of safety.
The McAmis window frame kit comes with all of the parts you'd need to fabricate the frame to fit a particular window, including a bender to form the tight radius of the window corners. Once in the shape we desired, we laid out of the tabs for the window screws before welding them in place and drilling the coordinating holes in the lexan window. We spaced out the countersunk screws 3.5-inches around the perimeter of the window, with 18 screws in total, to provide solid support for the window all the way around.
With the window attached to the door, we can then tie them together by building the frame out of the kit we received from TMPP. A small tubing bender is supplied for the tight radius of the frame, but the larger bends that shape it to the door requires us to simply bend them by hand. Once we have the frame in the shape we desired, we lay out the bolt pattern and spacing on the window to match the frame, then weld these small tabs to the frame that provide our anchor places to mount the window to the frame.
With the factory hinges off the car, we sand down the door support to provide a surface to weld the TMPP hinges to. From there, we turn to the door side, mounting the pair of supplied tabs to the front surface of the door. TMPP provides an aluminum strip that mounts on the backside of the door to help distribute the load across the rather thin fiberglass structure.
To install the upper door latch, which keeps the window firmly secured to the car so the wind can’t get underneath, TMPP’s kit included a pre-bent horseshoe that serves as the clamping mechanism. This horseshoe requires some fab work, and as you can see in the images, we’ve essentially just bent it over to reach out around the A-pillar from the chassis to the latch. This latch mounts to the window itself and connects the window to the chassis using the horseshoe. Using a matching hole placed in the side window, the upper door latch can be released from inside or outside the car.
The upper door latch, which serves to secure the window portion of the door to the car as the wind rushes over and around the car, mounts to the window itself and latches to the bent 'horseshoe' that we've welded to the top of the chassis hoop. Like the door handle itself, this latch can be opened from inside or outside the car to to release the door.
With some modification, we were able to use our stock OEM door latch pin with the new latch. We then mounted up the door handle and release mechanism, and installed the new TMPP door latch onto the door.
For the door handle itself, rather than use OEM-like handles, we’ll be using those typically found on full-tube doorslammers, in which the handle mechanism is mounted inside the door frame with a handle protruding from the armrest area that can be opened from the inside by the driver or by someone outside the car through a small hole drilled into the lexan. The mechanism uses spring tension for the handle, with a ball-thread that runs from the handle to the arm that releases the door latch.
To drill the necessary holes in the windows for the upper door latch and the door handle, we simply drilled a couple of small holes and then used a body saw, which you can purchase from most hardware stores.

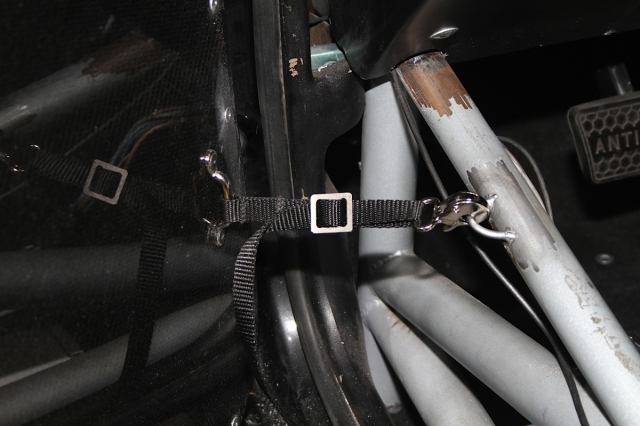
Here’s our door strap kit completed and installed. This strap, which holds the door to a tab welded to the chassis near the roll cage, keeps the door from opening too far. Unlike a factory door that has a stopping mechanism built into the hinges, the rather basic race car applications don’t, thus, this is how it’s generally done.
(Left) Putting the finishing touches on the door by mounting our carbon fiber door panel to cover the interior of the door. (Center) Here, you can see the finished door from the inside, while at right is the finished product from the outside. We have some odds and ends to complete (including paint), which we'll update you on in the future.
We also received a set of four five-pound weight pucks from TMPP, which will serve as ballast that we can place according to where we decide is best for proper weight distribution. Once we’re finished with both doors and other ongoing projects, we’ll be fabricating mounting tabs according to the NHRA regulations to install the pucks.

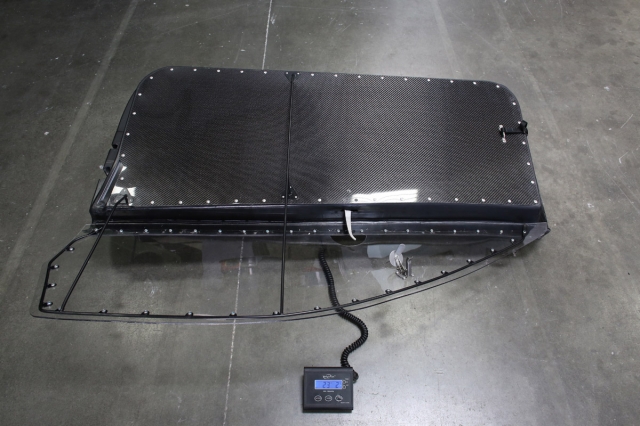
The final product: 23 lbs. 2 oz. – roughly a third of the weight of the original door that we just removed. Plus the doors are much easier to remove when servicing the car in the pits.
While not one of the most advanced of projects on a race car that one could undertake, installing a set of fiberglass doors on an original vehicle virtually from scratch can be quite a job, even if you are an experienced fabricator. However, thanks to the high-quality parts that Tim McAmis Performance Parts provides through their ever-growing catalog, which all come complete with detailed instructions, much of the dirty work of fabricating the hinges and tabs, building the latches, and other time-consuming ‘dirty work’ are behind you before you even start, bringing you one step closer to getting your made-over ride back out on the race track.
We’re certain the weight savings gained with our project will pay dividends on our time slips, and we’ll be sure to bring you up to speed as soon as we get back out there with BlownZ!


